Para finalizar la integración añadiremos un mando TRÅDFRI Remote control para controlar ambas tiras y sus funciones
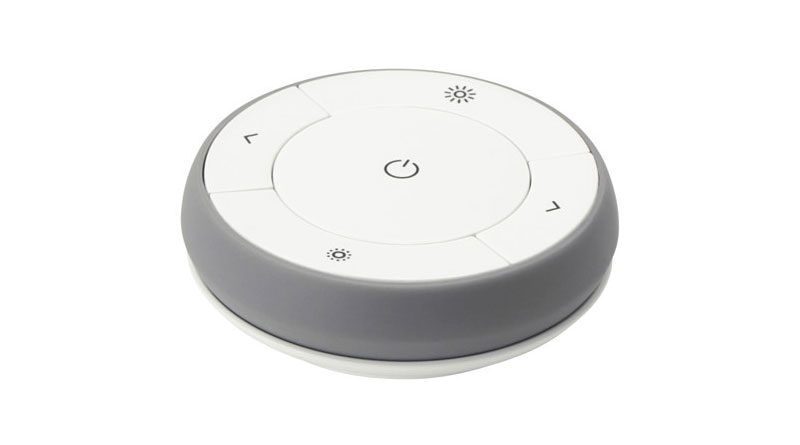
Estas serán las automatizaciones ligadas a cada uno de los botones del mando
###########################################
#### Mando Ikea kuces navidad
###########################################

###########################################
## dim up/down arbol
###########################################

- id: ikea_controller_dim_up_luces_navidad
  alias: Ikea controller dim up oriol luces navidad
  trigger:
    platform: state
    entity_id: sensor.ikea_mando_luces_navidad_evento
    to: brightness_up_click
  action:
    - service: input_select.select_next
      entity_id: input_select.wled_effect_arbol
    - data_template:
        topic: "wled/arbol/api"
        payload: 'FX={{ states(''input_select.wled_effect_arbol'')[:3] }}'
      service: mqtt.publish

- id: ikea_controller_dim_down_luces_navidad
  alias: Ikea controller dim down luces navidad
  trigger:
    platform: state
    entity_id: sensor.ikea_mando_luces_navidad_evento
    to: brightness_down_click
  action:
    - service: input_select.select_next
      entity_id: input_select.wled_palette_arbol
    - data_template:
        topic: "wled/arbol/api"
        payload: 'FP={{ states(''input_select.wled_palette_arbol'')[:2] }}'
      service: mqtt.publish


###################
## Toggle
###################

- id: ikea_controller_toggle_luces_navidad
  alias: Ikea Controller - Toggle luces navidad
  trigger:
    - platform: state
      entity_id: sensor.ikea_mando_luces_navidad_evento
      to: "toggle"
  condition:
  action:
    - service: light.toggle
      data:
        entity_id: light.wled_arbol
    - service: light.toggle
      data:
        entity_id: light.wled_balcon

###########################################
## warm up/down balcon
###########################################


- id: ikea_controller_warm_up_luces_navidad
  alias: Ikea controller warm up luces navidad
  trigger:
    platform: state
    entity_id: sensor.ikea_mando_luces_navidad_evento
    to: arrow_right_click
  action:
    - service: input_select.select_next
      entity_id: input_select.wled_effect_balcon
    - data_template:
        topic: "wled/balcon/api"
        payload: 'FX={{ states(''input_select.wled_effect_balcon'')[:3] }}'
      service: mqtt.publish

- id: ikea_controller_warm_down_luces_navidad
  alias: Ikea controller warm down luces navidad
  trigger:
    platform: state
    entity_id: sensor.ikea_mando_luces_navidad_evento
    to: arrow_left_click
  action:
    - service: input_select.select_next
      entity_id: input_select.wled_palette_balcon
    - data_template:
        topic: "wled/balcon/api"
        payload: 'FP={{ states(''input_select.wled_palette_balcon'')[:2] }}'
      service: mqtt.publish
Y estas serán las automatizaciones ligadas a los input select de las paletas de colores y efectos de cada una de las tiras
###########################################
- id: wled_arbol_seleccionar_paleta
alias: wled_arbol_seleccionar_paleta
initial_state: 'on'
trigger:
- entity_id: input_select.wled_palette_arbol
platform: state
condition: []
action:
- data_template:
topic: "wled/arbol/api"
payload: 'FP={{ states(''input_select.wled_palette_arbol'')[:2] }}'
service: mqtt.publish
- id: wled_arbol_seleccionar_efecto
alias: wled_arbol_seleccionar_efecto
initial_state: 'on'
trigger:
- entity_id: input_select.wled_effect_arbol
platform: state
condition: []
action:
- data_template:
topic: "wled/arbol/api"
payload: 'FX={{ states(''input_select.wled_effect_arbol'')[:3] }}'
service: mqtt.publish
###########################################3
- id: wled_balcon_seleccionar_paleta
alias: wled_balcon_seleccionar_paleta
initial_state: 'on'
trigger:
- entity_id: input_select.wled_palette_balcon
platform: state
condition: []
action:
- data_template:
topic: "wled/balcon/api"
payload: 'FP={{ states(''input_select.wled_palette_balcon'')[:2] }}'
service: mqtt.publish
- id: wled_balcon_seleccionar_efecto
alias: wled_balcon_seleccionar_efecto
initial_state: 'on'
trigger:
- entity_id: input_select.wled_effect_balcon
platform: state
condition: []
action:
- data_template:
topic: "wled/balcon/api"
payload: 'FX={{ states(''input_select.wled_effect_balcon'')[:3] }}'
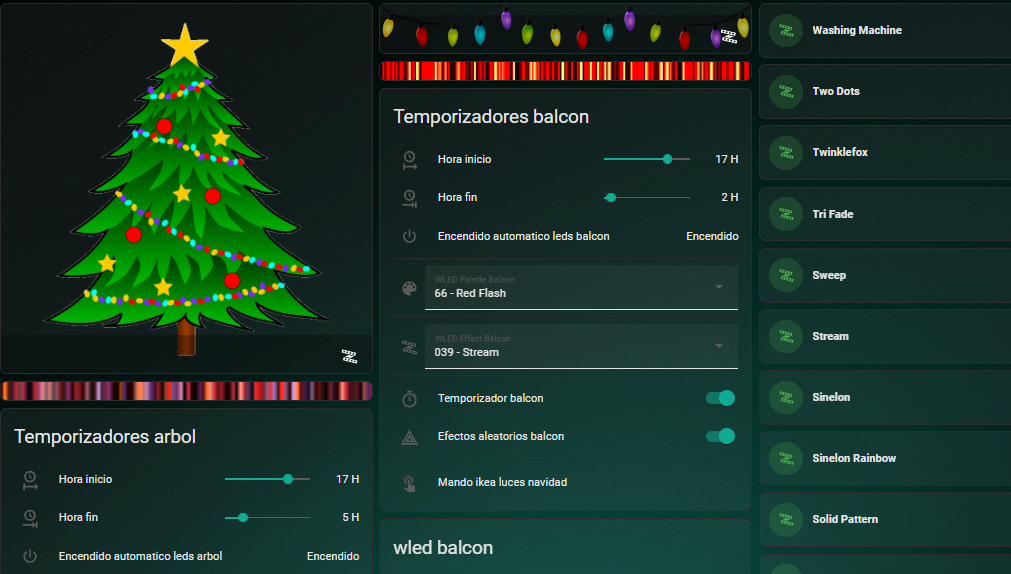
service: mqtt.publishAñadiremos toda la parte grafica en nuestro panel , debería parecerse a esto
title: Navidad
icon: mdi:pine-tree
cards:

  - type: vertical-stack
    cards:

      - type: picture-glance
        # title: Arbol navidad
        entities:
          - light.wled_arbol
        state_image:
          "on": /local/navidad/arbol_5_on.png
          "off": /local/navidad/arbol_5_off.png
        entity: light.wled_arbol
        tap_action:
          action: toggle

      - type: conditional
        conditions:
          - entity: light.wled_arbol
            state: "on"
        card:
          type: iframe
          aspect_ratio: 5%
          url: https://xxxxxxxxxarbolyyyyyy.rivas.cloud/liveview

      - type: entities
        title: Temporizadores arbol
        show_name: false
        show_state: false
        show_header_toggle: false
        # columns: 3
        entities:
          - input_number.slider_inicio_encendido_wled_arbol
          - input_number.slider_inicio_apagado_wled_arbol
          - sensor.luces_wled_arbol_encendido
          - type: divider
          - input_select.wled_palette_arbol
          - type: divider
          - input_select.wled_effect_arbol
          - type: divider
          - input_boolean.input_temporizador_wled_arbol
          - input_boolean.input_aleatorio_wled_arbol
          - type: divider
          - sensor.ikea_mando_luces_navidad_evento

      - type: entities
        title: wled arbol
        show_name: true
        show_state: false
        show_header_toggle: false
        # columns: 3
        entities:
          - select.wled_preset
          - type: divider
          - light.wled_arbol
          - type: divider
          - number.wled_intensity
          - number.wled_speed
          - switch.wled_reverse
          - switch.wled_sync_receive
          - switch.wled_sync_send

  - type: vertical-stack
    cards:

      - type: picture-glance
        # title: Luces exteriores
        entities:
          - light.wled_balcon
        state_image:
          "on": /local/navidad/balcon_6_on.png
          "off": /local/navidad/balcon_6_off.png
        entity: light.wled_balcon
        tap_action:
          action: toggle

      - type: conditional
        conditions:
          - entity: light.wled_balcon
            state: "on"
        card:
          type: iframe
          aspect_ratio: 5%
          url: https://xxxxxxxxxbalconyyyyyy.rivas.cloud/liveview

      - type: entities
        title: Temporizadores balcon
        show_name: false
        show_state: false
        show_header_toggle: false
        # columns: 3
        entities:
          - input_number.slider_inicio_encendido_wled_balcon
          - input_number.slider_inicio_apagado_wled_balcon
          - sensor.luces_wled_balcon_encendido
          - type: divider
          - input_select.wled_palette_balcon
          - type: divider
          - input_select.wled_effect_balcon
          - type: divider
          - input_boolean.input_temporizador_wled_balcon
          - input_boolean.input_aleatorio_wled_balcon
          - type: divider
          - sensor.ikea_mando_luces_navidad_evento

      - type: entities
        title: wled balcon
        show_name: true
        show_state: false
        show_header_toggle: false
        # columns: 3
        entities:
          - select.wled_preset
          - type: divider
          - light.wled_balcon
          - type: divider
          - number.wled_balcon_intensity
          - number.wled_balcon_speed
          - switch.wled_balcon_reverse
          - switch.wled_balcon_sync_receive
          - switch.wled_balcon_sync_send

      - type: custom:mushroom-entity-card
        entity: light.wled_arbol
        name: Washing Machine
        secondary_info: none
        tap_action:
          action: call-service
          service: script.pasar_efecto_a_wled
          data:
            efecto: '113'
        icon_color: green

      - type: custom:mushroom-entity-card
        entity: light.wled_arbol
        name: Two Dots
        secondary_info: none
        tap_action:
          action: call-service
          service: script.pasar_efecto_a_wled
          data:
            efecto: '050'
        icon_color: green

      - type: custom:mushroom-entity-card
        entity: light.wled_arbol
        name: Twinklefox
        secondary_info: none
        tap_action:
          action: call-service
          service: script.pasar_efecto_a_wled
          data:
            efecto: '080'
        icon_color: green

  - type: vertical-stack
    cards:

      - type: custom:mushroom-entity-card
        entity: light.wled_arbol
        name: Tri Fade
        secondary_info: none
        tap_action:
          action: call-service
          service: script.pasar_efecto_a_wled
          data:
            efecto: '056'
        icon_color: green

      - type: custom:mushroom-entity-card
        entity: light.wled_arbol
        name: Sweep
        secondary_info: none
        tap_action:
          action: call-service
          service: script.pasar_efecto_a_wled
          data:
            efecto: '006'
        icon_color: green

      - type: custom:mushroom-entity-card
        entity: light.wled_arbol
        name: Stream
        secondary_info: none
        tap_action:
          action: call-service
          service: script.pasar_efecto_a_wled
          data:
            efecto: '039'
        icon_color: green

      - type: custom:mushroom-entity-card
        entity: light.wled_arbol
        name: Sinelon
        secondary_info: none
        tap_action:
          action: call-service
          service: script.pasar_efecto_a_wled
          data:
            efecto: '092'
        icon_color: green

      - type: custom:mushroom-entity-card
        entity: light.wled_arbol
        name: Sinelon Rainbow
        secondary_info: none
        tap_action:
          action: call-service
          service: script.pasar_efecto_a_wled
          data:
            efecto: '094'
        icon_color: green

      - type: custom:mushroom-entity-card
        entity: light.wled_arbol
        name: Solid Pattern
        secondary_info: none
        tap_action:
          action: call-service
          service: script.pasar_efecto_a_wled
          data:
            efecto: '083'
        icon_color: green

      - type: custom:mushroom-entity-card
        entity: light.wled_arbol
        name: Running
        secondary_info: none
        tap_action:
          action: call-service
          service: script.pasar_efecto_a_wled
          data:
            efecto: '015'
        icon_color: green

      - type: custom:mushroom-entity-card
        entity: light.wled_arbol
        name: Sine
        secondary_info: none
        tap_action:
          action: call-service
          service: script.pasar_efecto_a_wled
          data:
            efecto: '108'
        icon_color: green

      - type: custom:mushroom-entity-card
        entity: light.wled_arbol
        name: Sinelon Dual
        secondary_info: none
        tap_action:
          action: call-service
          service: script.pasar_efecto_a_wled
          data:
            efecto: '093'
        icon_color: green

      - type: custom:mushroom-entity-card
        entity: light.wled_arbol
        name: Phased Noise
        secondary_info: none
        tap_action:
          action: call-service
          service: script.pasar_efecto_a_wled
          data:
            efecto: '109'
        icon_color: green

      - type: custom:mushroom-entity-card
        entity: light.wled_arbol
        name: Popcorn
        secondary_info: none
        tap_action:
          action: call-service
          service: script.pasar_efecto_a_wled
          data:
            efecto: '095'
        icon_color: green

      - type: custom:mushroom-entity-card
        entity: light.wled_arbol
        name: Railway
        secondary_info: none
        tap_action:
          action: call-service
          service: script.pasar_efecto_a_wled
          data:
            efecto: '078'
        icon_color: green

      - type: custom:mushroom-entity-card
        entity: light.wled_arbol
        name: Meteor
        secondary_info: none
        tap_action:
          action: call-service
          service: script.pasar_efecto_a_wled
          data:
            efecto: '076'
        icon_color: green

      - type: custom:mushroom-entity-card
        entity: light.wled_arbol
        name: Noise 3
        secondary_info: none
        tap_action:
          action: call-service
          service: script.pasar_efecto_a_wled
          data:
            efecto: '072'
        icon_color: green

      - type: custom:mushroom-entity-card
        entity: light.wled_arbol
        name: Phased
        secondary_info: none
        tap_action:
          action: call-service
          service: script.pasar_efecto_a_wled
          data:
            efecto: '105'
        icon_color: green

      - type: custom:mushroom-entity-card
        entity: light.wled_arbol
        name: Fireworks 1D
        secondary_info: none
        tap_action:
          action: call-service
          service: script.pasar_efecto_a_wled
          data:
            efecto: '090'
        icon_color: green

      - type: custom:mushroom-entity-card
        entity: light.wled_arbol
        name: Glitter
        secondary_info: none
        tap_action:
          action: call-service
          service: script.pasar_efecto_a_wled
          data:
            efecto: '087'
        icon_color: green

      - type: custom:mushroom-entity-card
        entity: light.wled_arbol
        name: Lighthouse
        secondary_info: none
        tap_action:
          action: call-service
          service: script.pasar_efecto_a_wled
          data:
            efecto: '041'
        icon_color: green
Hemos añadido una serie de mushroom-entity-card que al hacer tap llaman al script de abajo , pasando como variable el numero de efecto.
pasar_efecto_a_wled:
alias: pasar efecto a tiras wled
fields:
efecto:
description: "Efecto a enviar"
example: "050"
sequence:
- data_template:
topic: "wled/arbol/api"
payload: 'FX={{ efecto }}'
service: mqtt.publish
- data_template:
topic: "wled/balcon/api"
payload: 'FX={{ efecto }}'
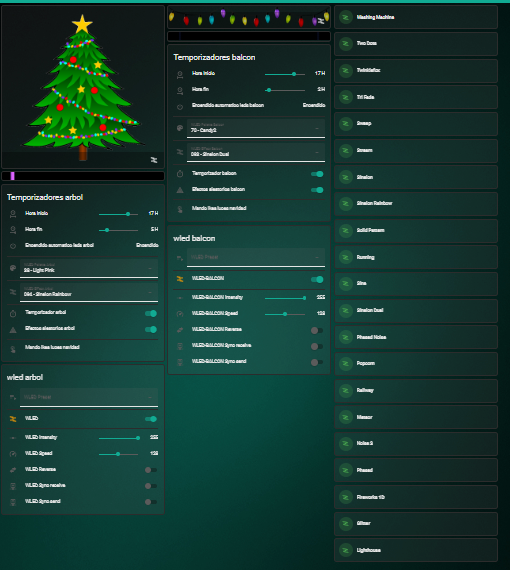
service: mqtt.publishY este seria el resultado final de nuestro panel
Y con esto y un bozcocho ……..
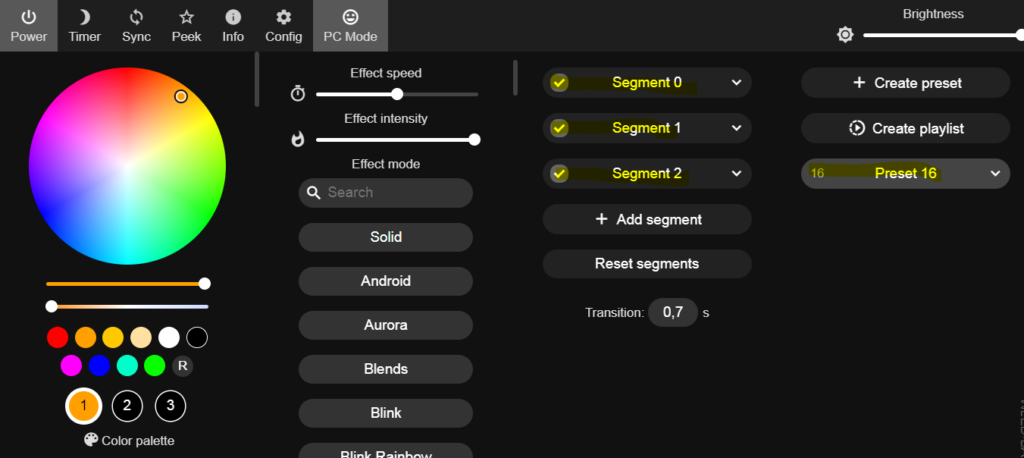
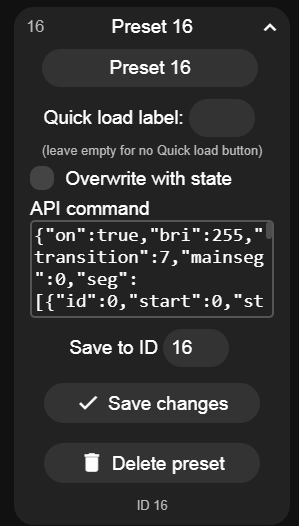
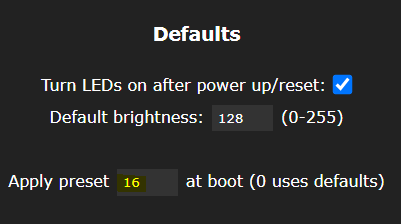
Bonus : Segmentos y guardado de presets , los segmentos no se guardan por defecto , en cada reinicio los perderíamos , para ello lo que tenemos que hacer es crear un preset con nuestros segments , asignarle un numero , por ejemplo el 16 e indicar que en el arranque cargue ese preset , así tendríamos de nuevo la configuración de nuestros segments funcionando.
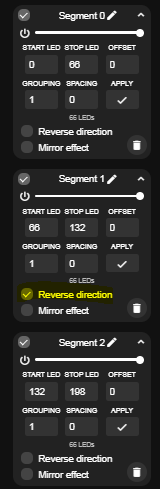
My Segments are gone after a reboot!
Segments are non-persistant by default. If you want to load your preset at every startup, just do the following:
- Set your segments up as desired
- Go into the Favorites tab in the web UI, click the save checkbox and save the config to preset slot number
16 - In LED settings, set
Boot Presetto16
This will be improved in a future release, so that you will be able to save multiple segment configurations!