
Hace unos días monte y leí los UID de varios RFID que tenia por casa y quería sacarme una copia para el tema de los contenedores que acaba de colocar el ayuntamiento ( el marrón y el gris no se abren si no es con un elemento RFID ) , la verdad es que no me corria prisa alguna , pero una mañana me encontre a la persona que hace la limpieza de la comunidad y me expreso su nerviosismo acerca de como actuar si no proporcionaba la comunidad un TAG para los contenedores.
Total que decidí retomar el tema de la grabación de los RFID que previamente había leído y suministrar a esa persona una copia del mi tag llavero.
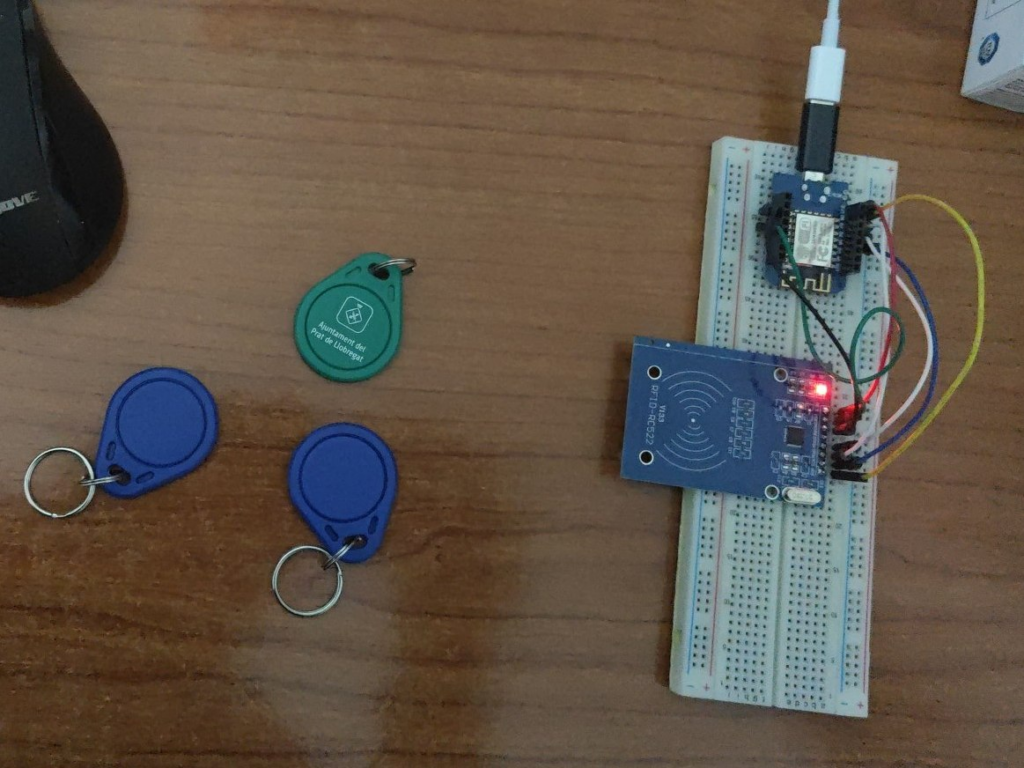
En una entrada previa explique como leer los cuatro primeros bytes del RFID que es donde esta el UID , montamos la protoboard según el conexionado que ya se comento para escribir esos cuatro bytes que son los que habitualmente se usan como identificador
En esta ocasión utilizaremos esta librería para la comunicación con el RC522 : GitHub – OSSLibraries/Arduino_MFRC522v2
Como era tarde y tampoco quería dedicarle excesivo tiempo use uno de los ejemplos que esta en el repositorio , este concretamente.
/*
* --------------------------------------------------------------------------------------------------------------------
* Example to change UID of changeable MIFARE card.
* --------------------------------------------------------------------------------------------------------------------
* This is a MFRC522 library example; for further details and other examples see: https://github.com/OSSLibraries/Arduino_MFRC522v2
*
* This sample shows how to set the UID on a UID changeable MIFARE card.
*
* @author Tom Clement
* @license Released into the public domain.
*
* Typical pin layout used:
* -----------------------------------------------------------------------------------------
* MFRC522 Arduino Arduino Arduino Arduino Arduino
* Reader/PCD Uno/101 Mega Nano v3 Leonardo/Micro Pro Micro
* Signal Pin Pin Pin Pin Pin Pin
* -----------------------------------------------------------------------------------------
* SPI SS SDA(SS) 10 53 D10 10 10
* SPI MOSI MOSI 11 / ICSP-4 51 D11 ICSP-4 16
* SPI MISO MISO 12 / ICSP-1 50 D12 ICSP-1 14
* SPI SCK SCK 13 / ICSP-3 52 D13 ICSP-3 15
*
* Not found? For more see: https://github.com/OSSLibraries/Arduino_MFRC522v2#pin-layout
*/
#include <MFRC522v2.h>
#include <MFRC522DriverSPI.h>
//#include <MFRC522DriverI2C.h>
#include <MFRC522DriverPinSimple.h>
#include <MFRC522Debug.h>
#include <MFRC522Hack.h>
MFRC522DriverPinSimple ss_pin(15); // Configurable, see typical pin layout above.
MFRC522DriverSPI driver(ss_pin);
//MFRC522DriverI2C driver();
MFRC522 mfrc522(driver); // Create MFRC522 instance.
MFRC522Hack mfrc522Hack(mfrc522, true); // Create MFRC522Hack instance.
/* Set your new UID here! */
constexpr uint8_t newUid[] = {0x36, 0x7B, 0x32, 0xBF};
MFRC522::MIFARE_Key key;
void setup() {
Serial.begin(115200); // Initialize serial communications with the PC for debugging.
while (!Serial); // Do nothing if no serial port is opened (added for Arduinos based on ATMEGA32U4).
mfrc522.PCD_Init(); // Init MFRC522 board.
Serial.println(F("Warning: this example overwrites the UID of your UID changeable card, use with care!"));
Serial.println(F("This example only works with MIFARE Classic cards."));
// Prepare key - all keys are set to FFFFFFFFFFFFh at chip delivery from the factory.
for (byte i = 0; i < 6; i++) {
key.keyByte[i] = 0xFF;
}
}
void loop() {
// Reset the loop if no new card present on the sensor/reader. This saves the entire process when idle. And if present, select one.
if ( !mfrc522.PICC_IsNewCardPresent() || !mfrc522.PICC_ReadCardSerial() ) {
delay(50);
return;
}
// Now a card is selected. The UID and SAK is in mfrc522.uid.
// Dump UID.
Serial.print(F("Card UID:"));
MFRC522Debug::PrintSelectedUID(mfrc522, Serial);
Serial.println();
// Set new UID.
if ( mfrc522Hack.MIFARE_SetUid(newUid, (byte)4, key, true) ) {
Serial.println(F("Wrote new UID to card."));
}
// Halt PICC and re-select it so DumpToSerial doesn't get confused.
mfrc522.PICC_HaltA();
if ( !mfrc522.PICC_IsNewCardPresent() || !mfrc522.PICC_ReadCardSerial() ) {
return;
}
// Dump the new memory contents.
Serial.println(F("New UID and contents:"));
MFRC522Debug::PICC_DumpToSerial(mfrc522, Serial, &(mfrc522.uid));
delay(2000);
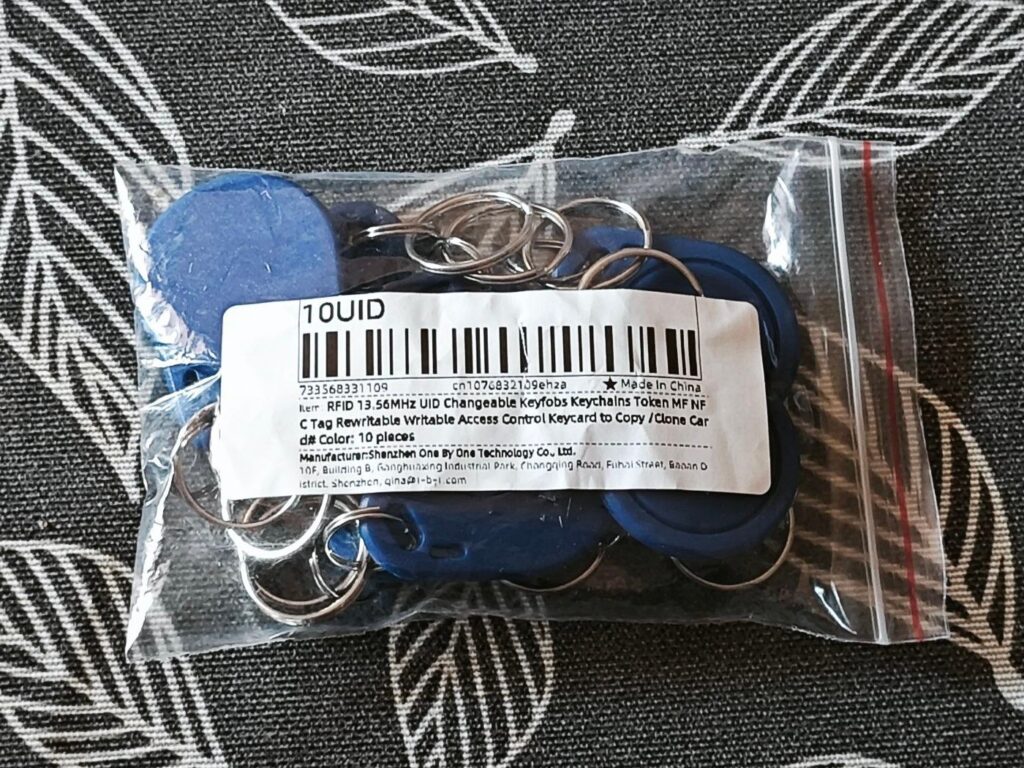
}Y ostias , no había forma de escribir los datos ni en la tarjeta que traía el kit , ni en el tag de llavero , por suerte también había pedido aquí diez tags de llavero reescribibles , y cogí uno para descartar que no fuera por el tag que habían enviado en el kit.
Una vez que use esos tags se hizo la luz y a la primera , como podemos ver en el log el UID inicial DE AD BE EF lo cambia a 73 F1 02 63 en el bloque 0 que es normalmente de solo lectura sin problema alguno.
21:04:52.422 -> Warning: this example overwrites the UID of your UID changeable card, use with care!
21:04:52.422 -> This example only works with MIFARE Classic cards.
21:04:55.792 -> Card UID: DE AD BE EF
21:04:55.839 -> Wrote new UID to card.
21:04:55.885 -> New UID and contents:
21:04:55.885 -> Card UID: 73 F1 02 63
21:04:55.885 -> Card SAK: 08
21:04:55.885 -> PICC type: MIFARE 1KB
21:04:55.885 -> Sector Block   0  1  2  3   4  5  6  7   8  9 10 11  12 13 14 15  AccessBits
21:04:55.885 ->   15     63   00 00 00 00  00 00 FF 07  80 69 FF FF  FF FF FF FF  [ 0 0 1 ]
21:04:55.885 ->          62   00 00 00 00  00 00 00 00  00 00 00 00  00 00 00 00  [ 0 0 0 ]
21:04:55.885 ->          61   00 00 00 00  00 00 00 00  00 00 00 00  00 00 00 00  [ 0 0 0 ]
21:04:55.885 ->          60   00 00 00 00  00 00 00 00  00 00 00 00  00 00 00 00  [ 0 0 0 ]
21:04:55.885 ->   14     59   00 00 00 00  00 00 FF 07  80 69 FF FF  FF FF FF FF  [ 0 0 1 ]
21:04:55.932 ->          58   00 00 00 00  00 00 00 00  00 00 00 00  00 00 00 00  [ 0 0 0 ]
21:04:55.932 ->          57   00 00 00 00  00 00 00 00  00 00 00 00  00 00 00 00  [ 0 0 0 ]
21:04:55.932 ->          56   00 00 00 00  00 00 00 00  00 00 00 00  00 00 00 00  [ 0 0 0 ]
21:04:55.932 ->   13     55   00 00 00 00  00 00 FF 07  80 69 FF FF  FF FF FF FF  [ 0 0 1 ]
21:04:55.932 ->          54   00 00 00 00  00 00 00 00  00 00 00 00  00 00 00 00  [ 0 0 0 ]
21:04:55.932 ->          53   00 00 00 00  00 00 00 00  00 00 00 00  00 00 00 00  [ 0 0 0 ]
21:04:55.932 ->          52   00 00 00 00  00 00 00 00  00 00 00 00  00 00 00 00  [ 0 0 0 ]
21:04:55.979 ->   12     51   00 00 00 00  00 00 FF 07  80 69 FF FF  FF FF FF FF  [ 0 0 1 ]
21:04:55.979 ->          50   00 00 00 00  00 00 00 00  00 00 00 00  00 00 00 00  [ 0 0 0 ]
21:04:55.979 ->          49   00 00 00 00  00 00 00 00  00 00 00 00  00 00 00 00  [ 0 0 0 ]
21:04:55.979 ->          48   00 00 00 00  00 00 00 00  00 00 00 00  00 00 00 00  [ 0 0 0 ]
21:04:55.979 ->   11     47   00 00 00 00  00 00 FF 07  80 69 FF FF  FF FF FF FF  [ 0 0 1 ]
21:04:55.979 ->          46   00 00 00 00  00 00 00 00  00 00 00 00  00 00 00 00  [ 0 0 0 ]
21:04:55.979 ->          45   00 00 00 00  00 00 00 00  00 00 00 00  00 00 00 00  [ 0 0 0 ]
21:04:56.027 ->          44   00 00 00 00  00 00 00 00  00 00 00 00  00 00 00 00  [ 0 0 0 ]
21:04:56.027 ->   10     43   00 00 00 00  00 00 FF 07  80 69 FF FF  FF FF FF FF  [ 0 0 1 ]
21:04:56.027 ->          42   00 00 00 00  00 00 00 00  00 00 00 00  00 00 00 00  [ 0 0 0 ]
21:04:56.027 ->          41   00 00 00 00  00 00 00 00  00 00 00 00  00 00 00 00  [ 0 0 0 ]
21:04:56.027 ->          40   00 00 00 00  00 00 00 00  00 00 00 00  00 00 00 00  [ 0 0 0 ]
21:04:56.027 ->    9     39   00 00 00 00  00 00 FF 07  80 69 FF FF  FF FF FF FF  [ 0 0 1 ]
21:04:56.027 ->          38   00 00 00 00  00 00 00 00  00 00 00 00  00 00 00 00  [ 0 0 0 ]
21:04:56.074 ->          37   00 00 00 00  00 00 00 00  00 00 00 00  00 00 00 00  [ 0 0 0 ]
21:04:56.074 ->          36   00 00 00 00  00 00 00 00  00 00 00 00  00 00 00 00  [ 0 0 0 ]
21:04:56.074 ->    8     35   00 00 00 00  00 00 FF 07  80 69 FF FF  FF FF FF FF  [ 0 0 1 ]
21:04:56.074 ->          34   00 00 00 00  00 00 00 00  00 00 00 00  00 00 00 00  [ 0 0 0 ]
21:04:56.074 ->          33   00 00 00 00  00 00 00 00  00 00 00 00  00 00 00 00  [ 0 0 0 ]
21:04:56.074 ->          32   00 00 00 00  00 00 00 00  00 00 00 00  00 00 00 00  [ 0 0 0 ]
21:04:56.121 ->    7     31   00 00 00 00  00 00 FF 07  80 69 FF FF  FF FF FF FF  [ 0 0 1 ]
21:04:56.121 ->          30   00 00 00 00  00 00 00 00  00 00 00 00  00 00 00 00  [ 0 0 0 ]
21:04:56.121 ->          29   00 00 00 00  00 00 00 00  00 00 00 00  00 00 00 00  [ 0 0 0 ]
21:04:56.121 ->          28   00 00 00 00  00 00 00 00  00 00 00 00  00 00 00 00  [ 0 0 0 ]
21:04:56.121 ->    6     27   00 00 00 00  00 00 FF 07  80 69 FF FF  FF FF FF FF  [ 0 0 1 ]
21:04:56.121 ->          26   00 00 00 00  00 00 00 00  00 00 00 00  00 00 00 00  [ 0 0 0 ]
21:04:56.121 ->          25   00 00 00 00  00 00 00 00  00 00 00 00  00 00 00 00  [ 0 0 0 ]
21:04:56.168 ->          24   00 00 00 00  00 00 00 00  00 00 00 00  00 00 00 00  [ 0 0 0 ]
21:04:56.168 ->    5     23   00 00 00 00  00 00 FF 07  80 69 FF FF  FF FF FF FF  [ 0 0 1 ]
21:04:56.168 ->          22   00 00 00 00  00 00 00 00  00 00 00 00  00 00 00 00  [ 0 0 0 ]
21:04:56.168 ->          21   00 00 00 00  00 00 00 00  00 00 00 00  00 00 00 00  [ 0 0 0 ]
21:04:56.168 ->          20   00 00 00 00  00 00 00 00  00 00 00 00  00 00 00 00  [ 0 0 0 ]
21:04:56.168 ->    4     19   00 00 00 00  00 00 FF 07  80 69 FF FF  FF FF FF FF  [ 0 0 1 ]
21:04:56.168 ->          18   00 00 00 00  00 00 00 00  00 00 00 00  00 00 00 00  [ 0 0 0 ]
21:04:56.215 ->          17   00 00 00 00  00 00 00 00  00 00 00 00  00 00 00 00  [ 0 0 0 ]
21:04:56.215 ->          16   00 00 00 00  00 00 00 00  00 00 00 00  00 00 00 00  [ 0 0 0 ]
21:04:56.215 ->    3     15   00 00 00 00  00 00 FF 07  80 69 FF FF  FF FF FF FF  [ 0 0 1 ]
21:04:56.215 ->          14   00 00 00 00  00 00 00 00  00 00 00 00  00 00 00 00  [ 0 0 0 ]
21:04:56.215 ->          13   00 00 00 00  00 00 00 00  00 00 00 00  00 00 00 00  [ 0 0 0 ]
21:04:56.215 ->          12   00 00 00 00  00 00 00 00  00 00 00 00  00 00 00 00  [ 0 0 0 ]
21:04:56.215 ->    2     11   00 00 00 00  00 00 FF 07  80 69 FF FF  FF FF FF FF  [ 0 0 1 ]
21:04:56.262 ->          10   00 00 00 00  00 00 00 00  00 00 00 00  00 00 00 00  [ 0 0 0 ]
21:04:56.262 ->           9   00 00 00 00  00 00 00 00  00 00 00 00  00 00 00 00  [ 0 0 0 ]
21:04:56.262 ->           8   00 00 00 00  00 00 00 00  00 00 00 00  00 00 00 00  [ 0 0 0 ]
21:04:56.262 ->    1      7   00 00 00 00  00 00 FF 07  80 69 FF FF  FF FF FF FF  [ 0 0 1 ]
21:04:56.262 ->           6   00 00 00 00  00 00 00 00  00 00 00 00  00 00 00 00  [ 0 0 0 ]
21:04:56.262 ->           5   00 00 00 00  00 00 00 00  00 00 00 00  00 00 00 00  [ 0 0 0 ]
21:04:56.262 ->           4   00 00 00 00  00 00 00 00  00 00 00 00  00 00 00 00  [ 0 0 0 ]
21:04:56.309 ->    0      3   00 00 00 00  00 00 FF 07  80 69 FF FF  FF FF FF FF  [ 0 0 1 ]
21:04:56.309 ->           2   00 00 00 00  00 00 00 00  00 00 00 00  00 00 00 00  [ 0 0 0 ]
21:04:56.309 ->           1   00 00 00 00  00 00 00 00  00 00 00 00  00 00 00 00  [ 0 0 0 ]
21:04:56.309 ->           0   73 F1 02 63  E3 08 04 00  62 63 64 65  66 67 68 69  [ 0 0 0 ]
21:04:56.309 ->
21:05:09.587 -> Card UID: 73 F1 02 63
21:05:09.634 -> Wrote new UID to card.
21:05:09.634 -> New UID and contents:
21:05:09.634 -> Card UID: 73 F1 02 63
21:05:09.634 -> Card SAK: 08
21:05:09.634 -> PICC type: MIFARE 1KB
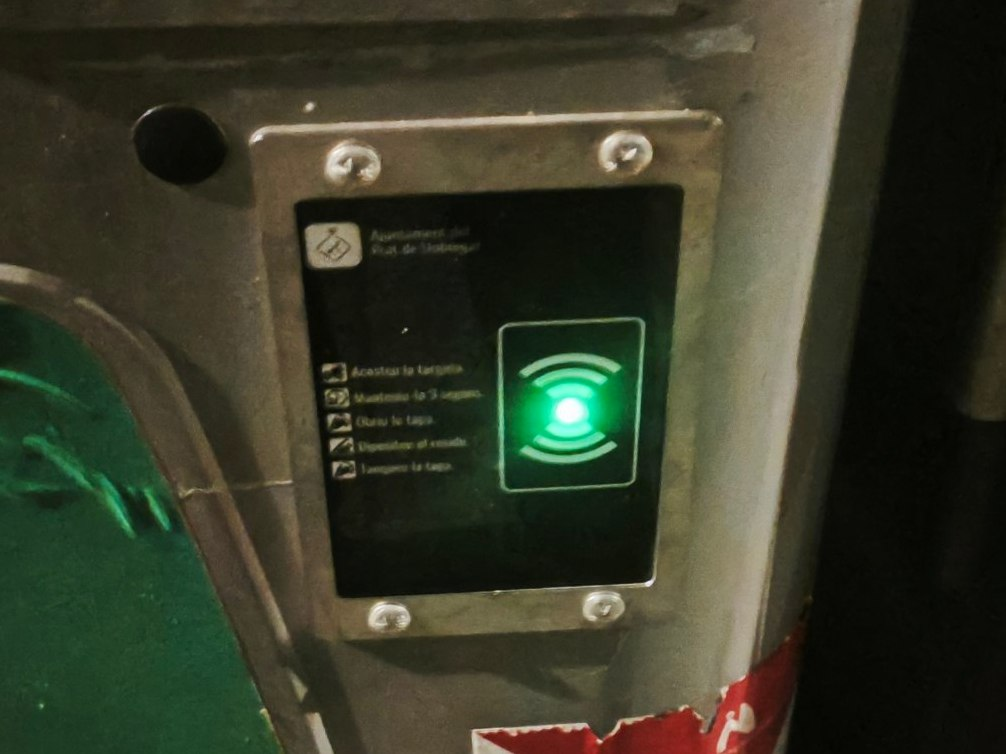
Ya solo toca probarlo en la calle en plan ninja con alevosía y nocturnidad
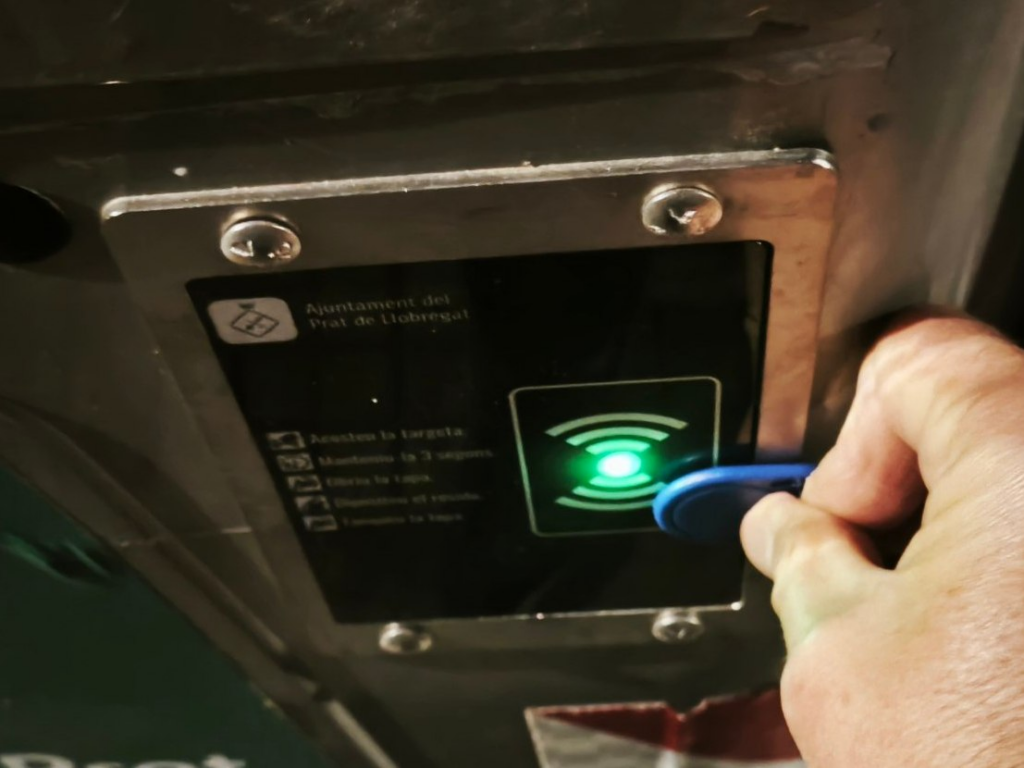
Y tachannnnnnnnnnnnnnnnnnnnnn , a la primera ………………..
Y con esto y un bizcocho ………..