
Hay dos métodos para integrar un SAI a MQTT , cada uno de ellos ofrece información diferente
El primero es modificando el fichero upsmon.conf
Añadiremos estos líneas para que nos notifique los cambios de estado
NOTIFYCMD /etc/nut/mqttnotify/nutnotify.sh

NOTIFYFLAG ONLINE       SYSLOG+WALL+EXEC
NOTIFYFLAG ONBATT       SYSLOG+WALL+EXEC
NOTIFYFLAG LOWBATT      SYSLOG+WALL+EXEC
NOTIFYFLAG FSD          SYSLOG+WALL+EXEC
NOTIFYFLAG COMMOK       SYSLOG+WALL+EXEC
NOTIFYFLAG COMMBAD      SYSLOG+WALL+EXEC
NOTIFYFLAG SHUTDOWN     SYSLOG+WALL+EXEC
NOTIFYFLAG REPLBATT     SYSLOG+WALL+EXEC
NOTIFYFLAG NOCOMM       SYSLOG+WALL+EXEC
NOTIFYFLAG NOPARENT     SYSLOG+WALL+EXEC
Instalaremos el cliente de mosquitto en nuestra raspberry pi zero 2 w
sudo apt-get install mosquitto-clients
Crearemos el fichero /etc/nut/mqttnotify/nutnotify.sh y lo configuraremos adecuadamente
#!/bin/bash
mosquitto_pub -h 192.168.1.145 -t "power/$UPSNAME/notify/$NOTIFYTYPE" -m "$1" -u mqttuser -P mqttpasswd
Daremos los permisos adecuados
sudo chown root.nut /etc/nut/mqttnotify/nutnotify.sh
sudo chmod 750 /etc/nut/mqttnotify/nutnotify.sh
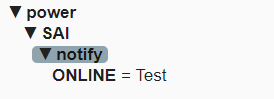
SI queremos probarlo podemos hacerlo con
UPSNAME=SAI NOTIFYTYPE=ONLINE /etc/nut/mqttnotify/nutnotify.sh "Test"
y nos tendría que llegar perfectamente a nuestro MQTT
Reiniciaremos y listo , y anos llegaran todos los cambios de estado via MQTT

Esta bien , pero a mi personalmente también me gusta que llegue toda la información disponible de NUT via MQTT , en github encontre este proyecto que parecía que se adaptaba bastante bien
En el fichero config.sh definimos toda la parte de comunicaciones de MQTT
#!/bin/bash

# Configuration for MQTT Broker
mqtt_broker="xxxxxxxxx.duckdns.org"
mqtt_port="18883"
mqtt_username="yyyyyyyyyy"
mqtt_password="zzzzzzzzzz"
mqtt_client_id="NUT"
mqtt_topic="externo/sai"
Este seria el fichero mqtt_upsc_script.sh
#!/bin/bash

################################################################################
# This script retrieves UPS (Uninterruptible Power Supply) information using the
# upsc command, converts it to JSON format, and publishes it to an MQTT broker.
#
# Usage: ./mqtt_upsc_script.sh <device_name>
#
# The script requires the upsc command to be installed, and it uses mosquitto_pub
# to publish the JSON output to an MQTT broker. Configuration details are kept
# in the 'config.sh' file. Make sure to set the appropriate MQTT broker settings
# in the 'config.sh' file before running the script.
################################################################################

# Set environment variable for the directory
UPS_JSON_PUBLISHER_DIR="/home/antonio/scripts/ups-json-publisher"

# Check if the script was called with a device name as an argument
if [ $# -ne 1 ]; then
    echo "Usage: $0 <device_name>"
    exit 1
fi

# Extract device name from the argument
device_name=$1

# Execute the `upsc` command and store the output in a variable
upsc_output=$(upsc "$device_name" 2>/dev/null)

# Check if the device is reachable
if [ -z "$upsc_output" ]; then
    echo "The device '$device_name' could not be reached."
    exit 1
fi

# Convert output to JSON format
json_output="{"
while IFS=: read -r key value; do
    key=$(echo "$key" | sed 's/^[ \t]*//;s/[ \t]*$//')
    value=$(echo "$value" | sed 's/^[ \t]*//;s/[ \t]*$//')
    json_output+="\"$key\":\"$value\","
done <<< "$upsc_output"
json_output="${json_output%,}"  # Remove the trailing comma
json_output+="}"

# Display JSON output
echo "$json_output"

# Load configuration variables
source "$UPS_JSON_PUBLISHER_DIR/config.sh"

# Publish JSON output to MQTT broker
echo "$json_output" | mosquitto_pub -h "$mqtt_broker" -p "$mqtt_port" -u "$mqtt_username" -P "$mqtt_password" -i "$mqtt_client_id" -t "$mqtt_topic" -l
Este seria el fichero run_upsc_script.sh para que ejecute cada 5 segundos
#!/bin/bash

i=0

while [ $i -lt 12 ]; do # 12 five-second intervals in 1 minute
    /bin/timeout -s 2 2s  /bin/bash /home/antonio/scripts/ups-json-publisher/mqtt_upsc_script.sh sai_externo >/dev/null 2>&1
    sleep 5
    i=$(( i + 1 ))
    echo $i
done
Daremos permiso de ejecución a estos dos últimos ficheros con chmod +x

Añadiremos a crontab lo siguiente para que se ejecute cada minuto :
* * * * * /home/antonio/scripts/ups-json-publisher/run_upsc_script.sh
Y no aseguraremos que la primera linea en el fichero de crontab es
SHELL=/bin/bash
Después de reiniciar si todo es correcto deberíamos ver los valores en mqttexplorer
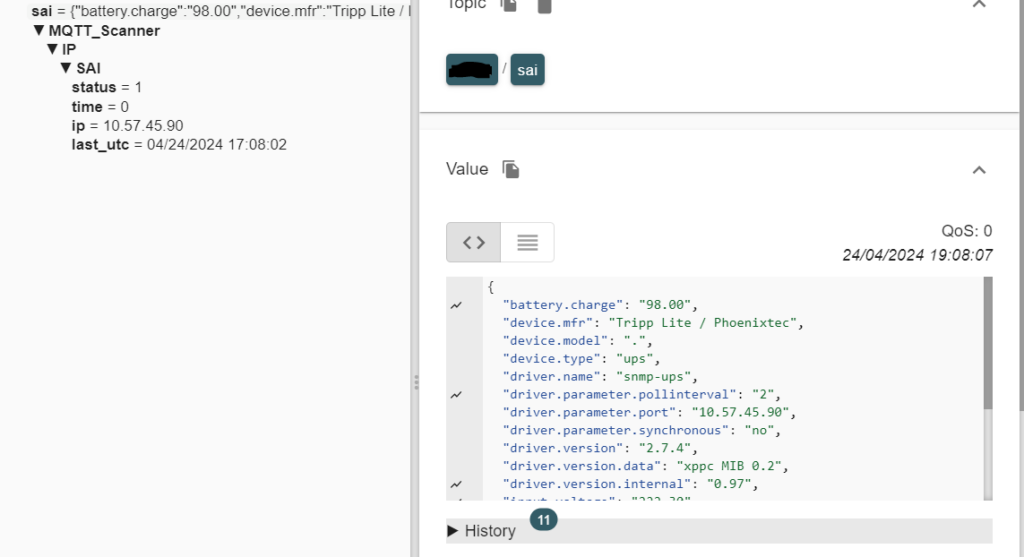
Y la información en un json similar a este
{
  "battery.charge": "98.00",
  "device.mfr": "Tripp Lite / Phoenixtec",
  "device.model": ".",
  "device.type": "ups",
  "driver.name": "snmp-ups",
  "driver.parameter.pollinterval": "2",
  "driver.parameter.port": "10.57.45.90",
  "driver.parameter.synchronous": "no",
  "driver.version": "2.7.4",
  "driver.version.data": "xppc MIB 0.2",
  "driver.version.internal": "0.97",
  "input.voltage": "222.30",
  "output.frequency": "49.90",
  "output.voltage": "222.30",
  "ups.load": "30.00",
  "ups.mfr": "Tripp Lite / Phoenixtec",
  "ups.model": ".",
  "ups.status": "BYPASS",
  "ups.temperature": "25.00"
}
Una vez que nos llega el json correctamente crearemos los sensores oportunos
  #################################################
  ### SAI Externo
  #################################################


    - name: sai_externo_carga_bateria
      state_topic: externo/sai
      unit_of_measurement: '%'
      icon: mdi:battery
      force_update: true
      value_template: "{{ value_json['battery.charge'] }}"

    - name: sai_externo_tension_entrada
      state_topic: externo/sai
      unit_of_measurement: 'V'
      icon: mdi:power-plug
      force_update: true
      value_template: "{{ value_json['input.voltage'] }}"

    - name: sai_externo_tension_salida
      state_topic: externo/sai
      unit_of_measurement: 'V'
      icon: mdi:power-socket
      force_update: true
      value_template: "{{ value_json['output.voltage'] }}"

    - name: sai_externo_frecuencia_salida
      state_topic: externo/sai
      unit_of_measurement: 'Hz'
      icon: mdi:sine-wave
      force_update: true
      value_template: "{{ value_json['output.frequency'] }}"

    - name: sai_externo_carga_salida
      state_topic: externo/sai
      unit_of_measurement: '%'
      icon: mdi:power
      force_update: true
      value_template: "{{ value_json['ups.load'] }}"

    - name: sai_externo_estado
      state_topic: externo/sai
      icon: mdi:list-status
      force_update: true
      value_template: "{{ value_json['ups.status'] }}"

    - name: sai_externo_temperatura
      state_topic: externo/sai
      icon: mdi:thermometer
      unit_of_measurement: 'ºC'
      force_update: true
      value_template: "{{ value_json['ups.temperature'] }}"
Estos son los diferentes estados que devuelve upsc
    # OL On line (no power failure) (opposite of OB - on battery)
    # LB Low battery
    # RB Replace battery
    # BYPASS Battery bypass active or no battery installed
    # SD Shutdown load
    # CP Cable power (must be present for cable to have valid reading)
    # CTS Clear to Send. Received from the UPS.
    # RTS Ready to Send. Sent by the PC.
    # DCD Data Carrier Detect. Received from the UPS.
    # RNG Ring indicate. Received from the UPS.
    # DTR Data Terminal Ready. Sent by the PC.
    # DSR Data Set Ready. Received from the UPS.
    # ST Send a BREAK on the transmit data line
    # NULL Disable this signal. Disabled signal will always be low except for OL which will always be high.
    # none Alias to NULL which matches some other documentation.
Crearemos un sensor para que cuando este en modo online o bypass nos devuelva que esta en modo online
  - platform: template
    sensors:
      sensor_estado_nas_externo_online:
        value_template: >
          {% if states.sensor.sai_externo_estado is none %}
             off
          {% else %}
            {% if
            is_state('sensor.sai_externo_estado', 'OL') or
            is_state('sensor.sai_externo_estado', 'BYPASS')
            %}
              on
            {% else %}
              off
            {% endif %}
          {% endif %}
Y ya lo podemos añadir a nuestros scripts y automatizaciones , este es parte de un script de petición de estado via Telegram
telegram_estado_sai_externo:
  alias: telegram_estado_sai_externo
  sequence:

    - service: notify.notif_telegram_bot
      data:
        message: |
          {{"\U0001F50B"}}{{"\U0001F50B"}} *SAI Externo* : {{now().strftime("%H:%M")}} {{"\U0001F50B"}}{{"\U0001F50B"}}

          *Carga bateria:* {{(states.sensor.sai_externo_carga_bateria.state | round(0,default=0))}} %
          *Tensión entrada:* {{(states.sensor.sai_externo_tension_entrada.state  | round(2,default=0))}} V.
          *Tensión salida:* {{(states.sensor.sai_externo_tension_salida.state  | round(2,default=0))}} V.
          *Frecuencia salida:* {{(states.sensor.sai_externo_frecuencia_salida.state  | round(1,default=0))}} Hz.
          *Carga salida:* {{(states.sensor.sai_externo_carga_salida.state | round(0,default=0))}} %
          *Estado:* {{states.sensor.sai_externo_estado.state }}
          *Temperatura:* {{(states.sensor.sai_externo_temperatura.state | round(0,default=0))}} ºC

          {% if is_state("sensor.sensor_estado_nas_externo_online", "on") %}{{"\U0001F7E2"}} *SAI Externo *: MODO ONLINE{% else %}{{"\U0001F534"}} *SAI Externo *: MODO BATERIAS{% endif %}
Y con esto y un bizcocho ……