
Quería montar algo para compartir toda la multimedia alojada en mi NAS , pero después de probar Plex vi que a la hora de transcodificar se comía parte importante de los recursos del NAS en la transcodificacion ,decidí buscar algo mas ligero para verlo desde el smart TV Samsung
Tanto Emby como Jellyfin tienen muy buena pinta , pero el problema es que no tienen un cliente oficial para smart TV con Tizen
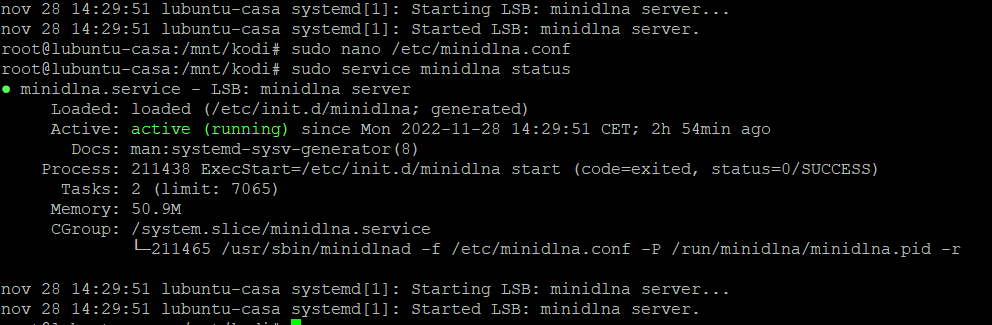
Lo primero será instalarlo
sudo apt install minidlna
sudo service minidlna start
sudo service minidlna status
Editaremos el archivo de configuración
sudo nano /etc/minidlna.conf
Y modificaremos la configuración a nuestro gusto
# If you want to restrict a media_dir to a specific content type, you can
# prepend the directory name with a letter representing the type (A, P or V),
# followed by a comma, as so:
#   * "A" for audio    (eg. media_dir=A,/var/lib/minidlna/music)
#   * "P" for pictures (eg. media_dir=P,/var/lib/minidlna/pictures)
#   * "V" for video    (eg. media_dir=V,/var/lib/minidlna/videos)
#   * "PV" for pictures and video (eg. media_dir=PV,/var/lib/minidlna/digital_camera)

media_dir=A,/mnt/datos_vm/navidrome/music
media_dir=V,/mnt/kodi/Peliculas
media_dir=V,/mnt/kodi/Series


# Set this to merge all media_dir base contents into the root container
# (The default is no.)
#merge_media_dirs=no

# Path to the directory that should hold the database and album art cache.
db_dir=/var/cache/minidlna

# Path to the directory that should hold the log file.
log_dir=/var/log

# Port number for HTTP traffic (descriptions, SOAP, media transfer).
# This option is mandatory (or it must be specified on the command-line using
# "-p").
port=8200

# URL presented to clients (e.g. http://example.com:80).
#presentation_url=/

# Name that the DLNA server presents to clients.
# Defaults to "hostname: username".
friendly_name=DLNA Casa

# Serial number the server reports to clients.
# Defaults to the MAC address of nework interface.
#serial=

# Model name the server reports to clients.
#model_name=Windows Media Connect compatible (MiniDLNA)

# Model number the server reports to clients.
# Defaults to the version number of minidlna.
#model_number=

# Automatic discovery of new files in the media_dir directory.
inotify=yes

# This option can be specified more than once.
album_art_names=Cover.jpg/cover.jpg/AlbumArtSmall.jpg/albumartsmall.jpg
album_art_names=AlbumArt.jpg/albumart.jpg/Album.jpg/album.jpg
album_art_names=Folder.jpg/folder.jpg/Thumb.jpg/thumb.jpg

# Strictly adhere to DLNA standards.
# This allows server-side downscaling of very large JPEG images, which may
# decrease JPEG serving performance on (at least) Sony DLNA products.
#strict_dlna=no

# Support for streaming .jpg and .mp3 files to a TiVo supporting HMO.
#enable_tivo=no

# Which method to use for registering in TiVo: 'bonjour' (default) or
# legacy 'beacon'
#tivo_discovery=bonjour

# SSDP notify interval, in seconds.
notify_interval=30
Añadiremos cada una de las carpetas a la biblioteca de medios
# If you want to restrict a media_dir to a specific content type, you can
# prepend the directory name with a letter representing the type (A, P or V),
# followed by a comma, as so:
#   * "A" for audio    (eg. media_dir=A,/var/lib/minidlna/music)
#   * "P" for pictures (eg. media_dir=P,/var/lib/minidlna/pictures)
#   * "V" for video    (eg. media_dir=V,/var/lib/minidlna/videos)
#   * "PV" for pictures and video (eg. media_dir=PV,/var/lib/minidlna/digital_camera)

media_dir=A,/mnt/datos_vm/navidrome/music
media_dir=V,/mnt/kodi/Peliculas
media_dir=V,/mnt/kodi/Series
Según sea audio , fotos o videos usaremos una u otra letra , si la carpeta contiene ambas cosas concatenaremos los dos tipos , por ejemplo
media_dir=VP,/mnt/kodi/media #Esta carpeta contendria ambos tipos de elementos videos y fotos
Esta opción nos permite que se auto descubra el servidor dentro de nuestra red
# Automatic discovery of new files in the media_dir directory.
inotify=yes
Poner nombre a nuestro servidor DLNA
# Name that the DLNA server presents to clients.
# Defaults to "hostname: username".
friendly_name=DLNA Casa
Añadido automático del contenido , tendremos que tener activada esta opción
# Automatic discovery of new files in the media_dir directory.
inotify=yes
Después de hacer estos cambios reiniciaremos el servicio con
sudo service minidlna restart
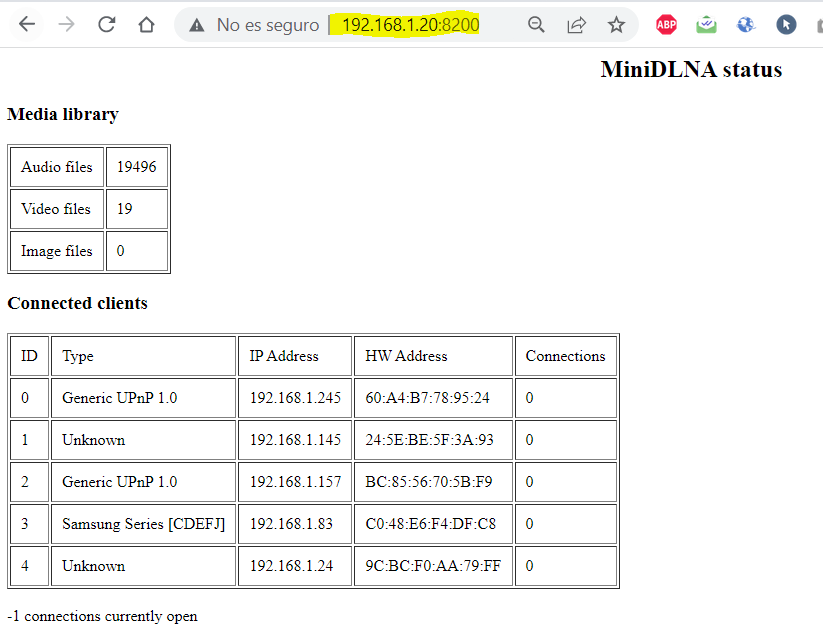
Accediendo a la IP de nuestro servidor con el puerto 8200 veremos como ha indexado la biblioteca de medios
Iniciar , parar , reiniciar y deshabilitar el servicio
exec /usr/sbin/service minidlna start
sudo systemctl start minidlna.service
sudo service minidlna start

sudo service minidlna stop

sudo service minidlna restart

sudo systemctl disable minidlna
Forzar el reescaneo de todos los medios
sudo minidlnad -R ; sudo service minidlna restart
Ahora ya nos lo detectara nuestro smartTV y podremos disfrutar el contenido en el , y con esto y un bizcocho …